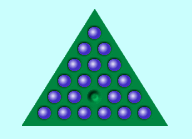
 Jump one peg over another into an empty spot,
removing the jumped peg from the board.
You can jump along any of the three directions parallel to the outside edges of the board.
Just click on a peg and if there's a jump available, the peg will jump.
If there's more than one jump available, you'll need to click on a destination.
The goal is to finish with one peg.
| red is good, black is bad |
| If you want to always win, avoid clicking on a bomb! Never click on a bomb, and never move a peg to a destination hole with a black X (if you do so by mistake, hit the "Back" button to take the move back). Then, hunt around with your mouse for a red peg or a red X (there will always be at least one, if you never make a bad move). Now you will win every time! | |
|
|
| Resets the game to the starting position with one peg missing. | ||
| Fills the entire board with pegs. Click on one of them to set the starting vacancy (peg missing at the start). Then begin play as usual, or hit Solve. | ||
| Take back the last jump (all the way back the start if you like). Very useful if you reach a dead end. You can also take back moves made in solve mode. | ||
| Solve the puzzle from the current board position down to one peg
("solve mode").
This final peg can be forced to end at the starting position,
as selected by the Assistance control.
The board is solved by selecting a random (good) jump,
so if you repeat this command you will likely get a different solution (unlike the
Ultimate Version
where the solution is always the same).
When in solve mode, this button changes to Pause, and if you click it the solving will pause, and the button changes to Continue. You can use these controls to halt at any intermediate point. | ||
 |
Change the board (10, 12, 15, 18 or 21 holes). | |
 |
This sets the time delay between jumps when the Solve button has been selected. You can even change this control while a solution is playing, to speed it up or slow it down. Slow, Normal, Fast, Faster and Fastest correspond to delays of 2, 1, 1/2, 1/10 and 0 seconds between jumps. | |
 |
This changes the settings for when those helpful bombs appear. You can even change this setting in the middle of the game, but not in solve mode. | |
| ||
| 6 moves: e5-c5, b5-d5, c3-e5, f6-d4, a1-c3-e5, d6-f6-d4 |
To discipher the move notation look here.
George Bell, October 2014